Monday, March 30, 2015

Quilting the Trifle Dish

I really went to town over the weekend and have the quilting just about finished on the Trifle Dish quilt. I think some of my rows are more successful than others, but this was supposed to be a practice exercise, so overall I'm happy with how things are turning out.

For the Orange Peel row, I did a sort of Baptist Fan design, free-hand. I love Baptist Fan's when I see them on other quilts, and this was just enough of a sampling to make me want to explore the design further.

The Pinwheel row was done in a Christina Cameli design called "Wibbly Wobbly". This was fun and easy to do, but my wibbly's look more like creepy crawly fingers to me.

 For the Jewel Block row, I just did some gently undulating rows of stars. Pretty straight-forward.

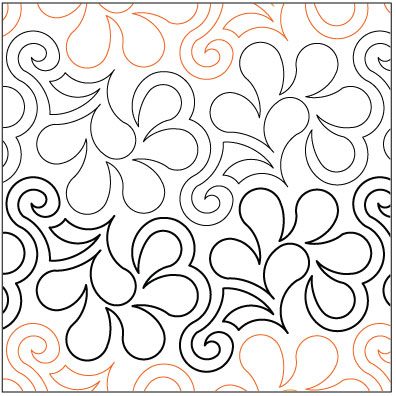
My Posie Blocks row was a bit of a struggle. I was trying to duplicate a sort of loopy flower I saw somewhere like this:


But I ended up with these sad things instead! They're not terrible, just SO not what I had in mind. This would have been a case where practicing on some scraps might have been a good idea. Oh well. Moving on...

The Sponge Roll layer was a fun one. I love the look of pebbling, but it's not easy to do, takes forever, and uses thread like you wouldn't believe. I decided to just do it on a section of each block, and didn't it turn out nice? I filled in the rest of each block with squiggles.

And finally, for the Butterfly and Four Patch row, I did a geometric meander. This is much harder for me than a stipple or curvy designs - something about those right angles are tricky to get right.

Now I just have the border to finish up, and then this baby is finally done!

Thursday, March 26, 2015

From the Archives: A Piece of Cake


This quilt was one I made while taking Camille Roskelly's Craftsy class, "Pre-Cut Piecing Made Simple". It's made with a Layer Cake from the Moda collection called "Giggles" designed by Me and My Sister.
Pond Ripples quilting pattern
This was a super-easy and quick quilt to sew, and I free-motioned it with an all-over pattern I call "Pond Ripples".


This quilt lives with my Aunt Barbie now.

Wednesday, March 25, 2015

Quilting the Trifle Dish: Hourglass Blocks

I'm quilting each row of the Trifle Dish quilt in something different. I think this will be a good way for me to practice some different designs and hopefully get comfortable with something other than stipples and swirls. (at least, that's the plan...)

My first block...still getting the hang of things!
I did my Hourglass Blocks last night in a sort of free-style paisley or tear drop pattern. I've done this before, and it takes me awhile to find my groove with it. My tear drops sometimes start turning into rows of feathers, or I have trouble pivoting off into different directions. Overall though, I'm happy with how the first row turned out.

By the end, things are looking much better! More even placement and shapes that aren't so wonky.
Also, remember when I said I wasn't too fussed about the shade variation with my background fabric? Yeah, that's not true anymore. It's bugging the hell out of me, but I'm not sure if there's anything to be done about it. Maybe after I wash it things will even out? 

Tuesday, March 24, 2015

Snapshots Quilt-Along: "Put the Kettle On"


Having all my pieces ready and labeled sure made putting this block together a lot easier. I'm going to keep doing that!

I think this little kettle turned out cute as can be, and I love the steam coming out of it - what a fun detail!

Sunday, March 22, 2015

Snapshots Quilt-Along: March


The March block for the Snapshots Quilt-Along is called "Put the Kettle On". These blocks have a million little pieces. It took me almost an hour to get everything cut out, and I used little sticky dots to keep everything organized


By the time I did all the cutting, I didn't have time to start sewing, so guess what I'll be working on tonight? On a separate note, look at how cute the selvage is on the Cotton + Steel fabric! I love the quote on there - "Leap, and the net will appear." 


You can bet I'm saving these for my Selvage spool blocks!

Saturday, March 21, 2015

Modern Buzzsaw Top Finish

Borders are sewn, and everything is pressed! I really love how this one turned out. My next step is basting, but I have to figure out the back first. All my backing fabrics I have are more feminine. I think I might have to make a trip to SR Harris!

Tank approves of the boy quilt!

Friday, March 20, 2015

Modern Buzzsaw Borders

The rows are sewn together and pressed, and now I'm working on adding the borders. For the narrow border, I decided on a green print from my stash.


I'm using the navy for the wide border, and I was about a foot short. Luckily, I had a few pieces leftover from trimming, and once I sewed them together it ended up being the perfect amount. I don't think it will be very visible either.

Pieced together border

Wednesday, March 18, 2015

Modern Buzzsaw

The blocks for Modern Buzzsaw are complete! Next steps are to sew them together, and add the borders. I love how fast this is coming together.


Saturday, March 14, 2015

Modern Buzzsaw Blocks

So, this Modern Buzzsaw quilt is so much fun! You start by sewing large Half-Square Triangles.


Then you slice them apart, flip them, and sew them back together again. I love that! Also, there are no seams to match, which makes this nice and relaxing to sew.


I'm doing half the blocks with the navy background, and half with a linen colored background. I think it'll be really nice.

Friday, March 13, 2015

Moda Trifle Dish: Basted


I finally basted the Moda Trifle Dish quilt last night after work. This quilt top has been folded over my banister for quite awhile now, and it was fun to see it all spread out again.


Strangely, the color of my cream background print has some variation to it - I don't know if parts of the bolt were faded or what happened exactly, but there are definitely some parts that are darker than others. I'm not terribly bothered by this, but it's weird, yes?


Now I just have to figure out how to quilt this. I'd like to try some new patterns I'm practicing, so I think I'll do each row in something different. As much as I'd just like to stipple this and call it good, I think this quilt calls for something a little more unique. 

Thursday, March 12, 2015

Farmers Wife Blocks


I decided to sew a few Farmers Wife blocks, since it'd been awhile. I'm making these totally out of my scrap bin, without much thought as to overall color scheme - we'll see how the whole thing turns out. Hopefully it won't be too big of a mess. I only have about 100 more to go!


Wednesday, March 11, 2015

Modern Buzzsaw


I'm visiting Seattle the end of April with my best friend. We'll be staying with her brother, and I thought a quilt would make a good host gift. I don't have a ton of more masculine fabric in my stash - I'm drawn to florals and more girly colors, so when I saw this collection from Connecting Threads called Birchtree Lane, I thought I'd better buy it for some boy projects.

I've decided to use this pattern from Amy Smarts book "Fabulously Fast Quilts". I think it should come together pretty fast.


Tuesday, March 10, 2015

Miss Kate's Turnover Update


At long last, the Miss Kate's Turnover blocks are complete! Considering there are only 9 of them, it's sad it took me as long as it did, but remember: Each block has over 70 pieces!

Despite my dislike for the block construction process, I'm actually quite fond of how these look. I think it's a unique design, and I like how crisp and clean it looks.

As you can see, my bed is my design wall, which kind of sucks, but I make do :). Now i just have to sew the whole top together and possibly consider adding a border.

Monday, March 9, 2015

Snapshots Quilt-Along: February


The February Snapshots Quilt-Along block is called "Sew On and Sew On". Isn't this little sewing machine just the cutest thing?


This block had lots of little pieces and sub-units to put together, but when you're just doing one of them, it's no big deal.

I'm sticking with my Cotton + Steel "Mustang" collection for this, and here's a side note: I purchased the fat quarter bundle from Craftsy, and when I unfolded each one for ironing, I discovered that four of them were cut wrong, and were more like a Fat Eighth cut. I contacted Craftsy customer service, hoping they'd be able to send me replacements for those 4. Instead, they're shipping me a whole new bundle! How awesome is that? I love Craftsy.

Saturday, March 7, 2015

Nancy Drew Tote Bag


Since the Nazi's temporarily stole my Nancy Drew quilt, I decided to take one of the unused charm packs and construct a tote bag out of them. I've got the bag panels complete using some of the techniques from the Quilt-as-You-Go class on Craftsy that I wrote about previously here. This bag is quite a bit simpler in design, and I pieced the patches together separately before sandwiching it with the batting and straight-stitch quilting it.

Now, I just have to add the straps, lining, and binding and then some lucky someone will have a cute Nancy Drew tote to show off.

Friday, March 6, 2015

Friday Finish: Postage Stamp Quilt


Let me tell you, quilting something takes forever when you can only work on it in 1/2 hour chunks! I was a little worried about how quilting this would go, since the entire thing is interfaced so it feels pretty thick. My machine did just fine with it though - no thread breakages or weirdness of any kind!

I'm happy with how this turned out. The backing is a combo of a few different prints from my stash, and I think the happy orange/pink colors work well with the rainbow front.


I had so much fun with this postage stamp, and seeing the finished product almost makes me want to start another one. It's definitely a good way to use up scraps, and I have plenty of those...

Thursday, March 5, 2015

Recipe Time: Alsatian Onion Tart

This is a recipe that I made up. I was inspired by this recipe on Annies Eats (http://www.annies-eats.com/2010/06/01/caramelized-onion-tart/), only I didn't have puff pastry or ricotta cheese and felt too lazy to go to the store. So I improvised, and the results were yummy. Here's how how to make it:

Ingredients:

  • 3 yellow onions, peeled and sliced thinly
    I didn't take a picture of my tart, but it looked pretty close to this!
  • 2 T. butter
  • 2 T. olive oil
  • 1 t. minced rosemary
  • 1/4 c. cream
  • 3 T. grated Parmesan cheese
  • Salt & Pepper
  • 1 pie crust
  • 1 egg yolk, beaten
Directions:

  1. Preheat oven to 375
  2. Heat olive oil and butter in saute pan
  3. Add onions and rosemary to saute pan and saute over low heat until reduced and caramelized (this takes awhile...plan on about 15 minutes)
  4. Add cream, stir to incorporate, and turn off heat
  5. Roll out pie dough into roughly a 12 inch circle - it doesn't have to be perfect. "Rustic" is a good thing here. Transfer circle to baking sheet or pizza stone.
  6. Pour the onion mixture into the middle of the pie dough and spread out evenly, leaving about a 1 inch rim of dough. Sprinkle with salt, pepper, and Parmesan cheese.
  7. Fold the plain rim of dough over the filling to form a crust
  8. Brush the crust with egg yolk
  9. Bake for 25-30 minutes or until golden brown
  10. Cool, slice into wedges, and serve
Notes:
  • I don't know why I'm calling this Alsatian - for some reason I just like the way it sounds, and I'm sure they have onion tarts in the Alsace, so it's probably OK. 
  • I made this as a little appetizer to take to my sister's Downton Abbey finale party, but I think it could also be good as a dinner, served with a hearty salad.
  • I made my own crust (1/4 butter, 1 c. flour, 1/4 water, 1 t. salt), but you could probably just use the pre-rolled Pillsbury kind too. 
  • I used fresh rosemary for my spice, because I have a big plant of it on my kitchen window. I think you could use whatever spices though, or none at all. The caramelized onions are delicious in and of themselves.

Wednesday, March 4, 2015

Thoughts on Basting

I have three quilts that need to be basted, so that's been on my mind a bit lately.

Basting quilts is often people's least favorite part of quilting, but I don't mind it so much. Here are a few of my opinions on the matter:
  • Use safety pins. It seems like people have very strong preferences on what to use - basting spray vs. pins is a much debated topic. I'm a pin fan. First of all, any substance that comes out of an aerosol can that requires lots of ventilation is something I avoid. I'm not a fan of stinky chemicals, so the idea of spraying them all over my quilt, whilst getting a headache is not appealing. Pins are cheap, pins are reusable, pins don't require ventilation. Enough said.
  • Find the right spot. This is a struggle for quilters. Very few of us have tables large enough to baste on, so that leaves the floor. That is, assuming you have hardwood floors, because carpet doesn't work so well. So if you have a spot of hard wood flooring to baste on, great...but then you have to crawl around on the floor, and generally do all kinds of gymnastics. The result is sore knees and elbows and general dread of ever having to do THAT again. So, be creative. Does your work have a conference room you can use after hours? Does your library have a community room you can hijack for a little bit? My LQS will let quilters use their classroom space for basting. Anyplace with tables that you can move together will work, and trust me - it's worth it to find a place that will let you do this. I use space at my work, and it's so fast to use tables now vs. the floor. I can baste a queen size quilt in about 40 minutes, start to finish. It's pretty painless. 
  • Don't pull your backing too tight. I'm convinced that most of the backing puckers people struggle with when quilting is due to them pulling their backing too tight when basting. Fabric has a lot of stretch and give to it. When you tape it down too tightly and proceed to baste, once that tape is released it springs back and causes wrinkles. I tape on all four sides, pulling the fabric just enough to smooth it, but not stretch it. 
That's all my wisdom for now. Time to get basting!

Sunday, March 1, 2015

Cathedral Windows Update

I'm sad to say, things have stalled a bit on the Cathedral Windows quilt. There are just so damn many four-patch units in this thing, and I'm sick to death of them! I mean, like over 350 four-patches! That's a lot. And I can't really proceed with anything else until those are done.

I'm about 1/2 way there, and don't worry - I'll buckle down and get this done. I'm just taking a little hiatus until I can face the four-patches again.